How To Cancel/Delete Facebook Pending Sent Requests

Facebook best place for connecting with friends and family. At Facebook we send request and follower other account to get in touch with that person. Facebook have lots of greats features which help us to find and communicate with others in a better way. As we already discussed about various Facebook tricks. Even if some having lots of friends and followers on their account they can easily convert Facebook profile into page.  These pages having different functionality as compare to personal account. But it is not easy to increase likes until your get popular or viral. But if you are really struggling for likes then my few successive Tips about Increasing Facebook Likes may help you a lot.
Today i will explain you how to cancel or delete Facebook pending sent requests. Facebook applied some restriction on all the features to reduce the misuse. So even on sending request to other at high extend is also restricted just because few make fake account just to increase friends faster. So to applied limits in case your current pending request ratio will increase the chances of getting blocked for sending requests further just because Facebook want you to request only to those who you really know. If are current pending request will be deleted then their are less chances for getting block. So if you want to cancel or delete Facebook pending sent requests then follow all the process explained below.

How To Cancel Or Delete Facebook Pending Sent Requests. ?

  • First of Log in your account.
  • Then open your Profile and click on Friends Sections.
  • In Friend section there is an option for Find Friends open it.
How To Cancel/Delete Facebook Pending Sent Requests
  • Now Scroll down their are Pending Receive Request Just there is an option for View Sent Request.
  • In case you are not able to find then Visit here.
  • List all people will appear whom you sent request and just cancel all of them and you have done it.
How To Cancel/Delete Facebook Pending Sent Requests
I hope you like this Facebook tutorial and learned to delete Facebook pending sent requests easily.

Article Source:http://www.techstarcle.com

Read More...

How To Use Whatsapp Without Mobile Number

Whatsapp is a very popular messenger app these days. Using whatsapp we can keep in touch with our friends and relatives. We can also make different groups in whatsapp to share different things among different kinds of people. Using whatsapp we share images, audio, video etc with our friends. Whatsapp become commonly used app by all different age groups. We its really easy to use whatsapp on smartphone. Because its really easy to handle whatsapp and to understand its features. But we should be aware of some important features and settings about whatsapp. As we use whatsapp on our smartphone. No doubt smartphone is personal device but our friends and family can easily access. Sometimes by mistake they format smartphone data. In that situation our whatsapp data also got erase. So you can easily recover delete whatsapp messages by following few steps.
Their are multiple whatsapp tricks and hacks. But from all them one of the best famous trick that i like most is to use whatsapp account without mobile number. As anyone can easily view whatsapp id if one having number. So if you really suffering from this and want to use whatsapp anonymously. Then you do not worry because in article we are going to explain about how to use whatsapp without mobile number.

Method To Use whatsapp Without Mobile Number.

Step 1. Firstly you have to download whatsapp messenger in your Android device and install and launch it.
Step 2. If you are old whatsapp user then you have to delete your whatsapp account and download and install whatsapp again.
Step 3. Next step is enter your name and verify your mobile number. But you do not enter your mobile number now.
Step 4. Then we have to verify your mobile number with another way. Download Text+ App in your mobile to verify your mobile number.
Step 5. After launching text + App you have to open the App and go to settings and select contacts.
Step 6. You will get a number for your personal use in the app. Copy that number or write it .
Step 7. Now open your whatsapp messenger and paste the number that you get from the text + App.
Step 8. Click on continue button now you will get a verification code in Text+ app.
Step 9. Get this code and verify your account. Now your whatsapp account is ready without any number.
I hope you like this tutorial and learn how to use whatsapp without mobile number. In case you face any problem regarding this topic please let us know in below comments.


Article Source:http://www.techstarcle.com

Read More...

How To Backup Contacts In Android Phone

Android mobiles are popular in market because Android offer you the amazing features in cheaper rates. Android is based on Linux based Operating System and hardware independent. Android smartphones include features like high quality camera, touch support, Fast 3G, 4G and so on internet speed connections, RAM, ROM, processor with many other features which makes Android a best class smartphone. Android is popular for its Apps and games marketplace. As normally use Google play store which offer a large number of Apps, games, ebooks at free and paid version.

 How To Backup Contacts In Android Phone. ?

As Android OS is an Google Inc Product. So Google provide all the features which need other services like playstore, drives, maps music and many more. To store huge amount data and keep them secure We need to create backup our all data safely. As i already discuss about some Best Backup Apps For Android. Google also provides Sync features to drive or gmail account for backups but we need high speed internet connection to do that. As the most important data of our phone is contact. So always to make backup of all of them. In case our Android device is lost  or sometimes our Android device is accidentally format by someone. If you don’t have internet to sync then we have to backup contacts in android on some other storage device so that we can take backup in case of any emergency. If you do not know how to backup contacts in android phone then don’t worry because today we are going to discuss some best methods to take backup all contacts in Android device. So that you can easily recover them whenever you want.

Method 1st:- Backup Android Contact To SD Card.

Contact App is an inbuilt Android app that comes with every Android device. It is used to manage contacts on our Android device, saved new contacts and allow to take backup of contacts into SD card or sim Card. We can transfer these contacts into PC or some other device.
Steps To Backup Contacts In Android.
1. Open your Android device menu and click on contact App.
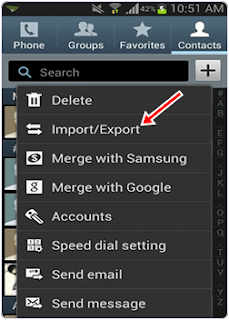
2. Click the Tap button now you see a popup Menu.
3. In the menu tap import/export menu item.
How To Backup Contacts In Android Phone
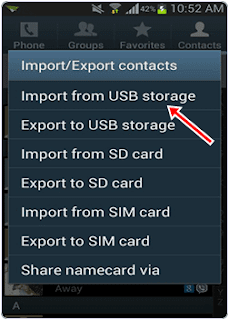
4. Now you see import/export popup menu. In the menu select export to external storage.
How To Backup Contacts In Android Phone
How To Backup Contacts In Android Phone5. In this way you can backup your Android contacts to SD card. The backup contacts are stored in VCard file in the SD card.
6. Now you can connect your phone with PC using Wifi and USB cable and Drag and Drop your contacts to PC or Laptop.

Method 2nd:- Backup Contacts From Android To Gmail.

You can also backup your Android phone contacts on your gmail Account by using the following simple steps.
Steps to Backup all contacts.
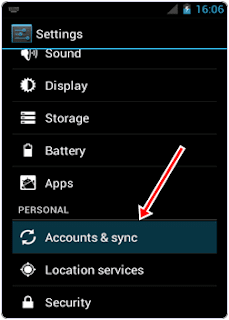
1. Open your Android menu and finds settings. You can also open setting by home screen drop down menu.
2. In the settings click on the scroll button to find Account and sync.
How To Backup Contacts In Android Phone
3. After that Login to your Gmail Account and tap sync contact option. It will take few minutes.
How To Backup Contacts In Android Phone
4. If you already save your contacts to your gmail Account, then you need not to follow first to steps and then directly login to your Account. Please open your Gmail on PC.
5. Select the contacts you want to backup and click more button then select export button.

How To Backup Contacts In Android Phone
6. Choose the selected contact radio button and select the vcard format then you can save your contact to PC. You can open them in the Address book.

Method 3rd:- Backup Contact s From Android To PC.

MobileGo is an efficient Application for sharing Android device data with computers. We can transfer data to and from Android to computer and vice versa. The app is available for both Windows and Mac OS. It allow you to take backup of your contacts just with one click.
Steps to Backup Contacts In Android.
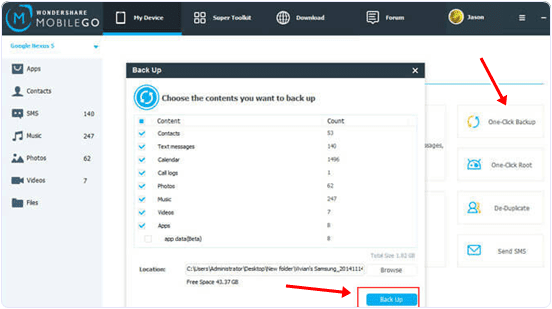
1. Download and Install MobileGo Wondershare App in you PC. Run the App.
2. Connect your Android device with WiFi or via a USB cable. Software will Automatically detect your Android device and show in the primary Window.
How To Backup Contacts In Android Phone
3. Now click on the contact tab to open the contact management Window.
4. In the contact management Window you see a list of your phone contacts.
5. Select the contacts and click on import/export button.
How To Backup Contacts In Android Phone
6. Now see a drop down menu. In the menu select export selected contacts to computer or export all contacts to computer.
How To Backup Contacts In Android Phone
MobileGo-App-contact-backup-button7. Now your contact list is ready and you can view it using Outlook Express, Window address book etc in vCard file.So these are some best ways to backup all contacts on android smartphone easily. If you know any other method don’t forget to share it with us in comments.

Article Source:http://www.techstarcle.com

Read More...

How To Share Zip Doc Pdf Apk Exe Files On Whatsapp

Whatsapp is one the most popular messages app for smartphone. Whatsapp becomes most of addicted because of its amazing features like chatting, calling, status, profile and many more. Whatsapp becomes famous after android smartphones are commonly used worldwide. Android devices are popular due to their amazing features and low cost. Android OS is based on Linux and hardware independent due to this reason Android Apps are compatible with different version of Android OS. Everyone use Android Phone because of its features and huge marketplace like Google Play Store. Where we can download apps and games according to different categories.
On Android devices we use various social messengers and social apps like Whatsapp, Facebook, Hike etc to keep in touch with friends and relative. From the list of all, whatsapp is at top. Whatsapp is was not available on PC as software application but we can access it to know check out how to install Whatsapp on PC. We share text, audio, video, images etc with our friends create groups and take enjoy of group chat etc. Dues to huge amount of personal data sometimes it may got deleted. So must check how to recover whatsapp deleted files. Due to these features Whatsapp become the most popular messenger. But whatsapp don’t have any online database and store media files into phone storage. So someone can easily access media files so you need to check how to hide images and videos from whatsapp gallery. But the another serious problem  faces by users of WhatsApp messenger is that, we can’t share PDF, doc, ppt, apk, rar, Zip, xks files on whatsapp. If you also want to know how to share these files data files on whatsapp then do not worry because in this article we provide yosu a trick toshare zip, PDF and apk like files on whatsapp with your friends.

How To Share Pdf, Doc, Apk, Zip Files On Whatsapp.

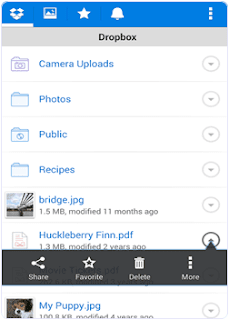
Step 1. You have to download the dropbox App first on your Android device. You need a dropbox account if you already have a drop account then no problem otherwise yo to create the account and login to it.
How To Share Zip Doc Pdf Apk Exe Files On Whatsapp
Step 2. Download and install CloudSend App to your device by clicking the button below. After installation launch the App and go through it. This will ask you for the authorization by the end. You have to allow all permissions to this App.
How To Share Zip Doc Pdf Apk Exe Files On Whatsapp
Step 3. After giving permission in our dropbox folder, a folder is created automatically named cloudsend. Now you can close the App after completing the authorization.
Step 4. If you want to send any type of file, hold the file through file manager and click the share button. Now you see a popup menu.
How To Share Zip Doc Pdf Apk Exe Files On Whatsapp
Step 5. From the popup menu press the Cloudsend option. Wait until the selected file is uploaded on the cloudsend folder in dropbox. The duration of uploading will depend on the size of file.
Step 6. Cloudsend App does not allow any restriction regarding the file size and provide two option after uploading the file copy and share. You can share the file or copy the link of any file.
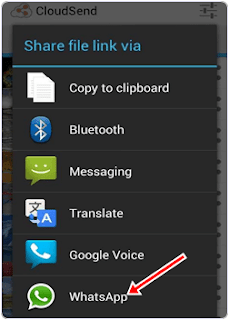
Step 7. Now select share button option. By selecting this option you will be able to share your file in different platform like Gmail, Whatsapp, SMS, WeChat etc.
How To Share Zip Doc Pdf Apk Exe Files On Whatsapp
Step 8. Now choose Whatsapp option to share file with Whatsapp. After selecting this option it will ask for the contacts with which you want to share files. Share the link of file with your friends.
I hope you like this method to share zip, pdf, apk and other files on whatsapp. Don’t forget to share it with others.

Article Source:http://www.techstarcle.com

Read More...

How To Hide Apps On Android Phone

Android phones are become a necessary part of life. We use Android mobiles in our day to day life for many different purposes. We can perform various task according to different occasions. As usually we access internet, share files, play videos and Audio, Messages and access many other internal phone features. In android device we can download external apps and games from marketplace. Because of these flexibility and availability of these features at low cost, that’s why Android devices are so popular. Android phones provide large storage in which we can install Apps, games and save our data. Android phones are assumed to be personal because they hold our personal App and data which we do not share with others. Normally we use screen lockers which protect our phone from misuse. If you are not using yet then i recommend you to check out
But in some situations we have to share our phone with our friends and relatives. But we also don’t want to share personal information and Apps with them. Sometime children wants to play games on android. As by mistake even they can format data or other details then backups should be necessary also. I have listed our best backup and restore apps for android. So to maintain our phone privacy one easiest way is by hiding apps. If you are facing serious problem regarding data security and privacy then you can try some data hiding apps. So without worry about security you can manage others for accessing your device. So here i am going to discuss about some best method to hide apps on android phone.

How To Hide Apps On Android Phone.

Method 1. Using GO Launcher Ex (For Non Rooted Phone).

How To Hide Apps On Android Phone


GO launcher Ex is one of the popular Android launcher Application that allow you to hide your Apps and maintain your Privacy. It is available on Google PlayStore for free. It can also lock Apps with Pattern and pin lock. It support 4M apk to increase our phone performance. It also provide XX transition effect to each slide. It is a light weight application with attractive and easy to use interface. It also provide different types of wallpapers to make our screen more attractive. Approximately 1B install this App.

Steps To Hide Apps In Android Using GO Launcher EX.

Step 1. Open your Playstore Account from your Android Phone and Search GO Launcher.
Step 2. You need to scan for the QR code to install this App.
How To Hide Apps On Android Phone
Step 3. Your Android Phone will Automatically search for GO Launcher App even if you do not have QR code scanner in your phone.
Step 4. Now install the GO launcher App in your phone.
Step 5. After the installation you have to apply GO Launcher to your Android device.
Step 6. Click and launch the App and by opening the main menu you can see different installed App in your App.
How To Hide Apps On Android Phone

Step 7. You can also go through the different option of the App by tapping the Menu button. From menu you look the Hide App option.
Step 8. A list of App will be shown on your screen.
Step 9. Now tick the Apps you want to hide and click the OK button. 
How To Hide Apps On Android Phone
Step 10. Now selected Apps will be hidden from your menu.

Method 2:- Using Link2SD Android App (for Rooted Phones).

How To Hide Apps On Android Phone


Link2SD is an Android App which is available on Google Playstore for free. It is provide an easy way to hide the Apps in Rooted Android phones. This App hide the Apps by freezing the background running App. It provide dual benefits one by freezing the App and other by saving the Amount of RAM which is necessary for multitasking. It can auto clear cache service, notify when movable App is installed. It can freeze both system and installed App. It can convert system App to user App and vice versa. Approximately 12,000,000 install this App.

Steps To Hide Android Apps With Link2SD.

Step 1. Download and Install the Link2SD Android App by clicking the button below.
How To Hide Apps On Android Phone

Step 2. Click and Launch the App into your phone.

Step 3. You can go through different Apps option at least once to understand its different options.
Step 4. In the App you will see all installed Apps.
Step 5. Click on the menu button and look for frozen option.
How To Hide Apps On Android Phone

Step 6. You will see the Apps now select the Apps and press OK button.
Step 7. Now your Apps are completely hidden and to unhidden the App long press the desired App and select unfreeze option.

These are best ways to hide apps on android phone. In you face any problem or you know any other easy and best method to hide apps on android mobile. Don’t forget to share it with us in comments.
Read More...

CSS Layer on layer with z-index

CSS operates in three dimensions – height, width and depth. We have seen the first two dimensions in previous lessons. In this lesson, we will learn how to let different elements become layers. In short, this means the order of which the elements overlap one another.
For that purpose, you can assign each element a number (z-index). The system is that an element with a higher number overlaps an element with a lower number.
Let us say we are playing poker and have a royal flush. Our hand can be presented in a way where each card has got a z-index:
CSS Layer on layer with z-index
In this case, the numbers follow on another (1-5) but the same result can be obtained by using 5 different numbers. The important thing is the chronological sequence of the numbers (the order).
The code in the card example could look like this:
 
 #ten_of_diamonds {
  position: absolute;
  left: 100px;
  top: 100px;
  z-index: 1;
 }

 #jack_of_diamonds {
  position: absolute;
  left: 115px;
  top: 115px;
  z-index: 2;
 }

 #queen_of_diamonds {
  position: absolute;
  left: 130px;
  top: 130px;
  z-index: 3;
 }

 #king_of_diamonds {
  position: absolute;
  left: 145px;
  top: 145px;
  z-index: 4;
 }

 #ace_of_diamonds {
  position: absolute;
  left: 160px;
  top: 160px;
  z-index: 5;
 }
 
The method is relatively simple but the possibilities are several. You can place images on text or text above text etc.

Summary

Layers can be used in many situations. For example, try to use z-index to create effects in headlines instead of creating these as graphics. For one thing, it is faster to load text and for another, it provides a potentially better ranking in search engines.

Article Source:http://www.techstarcle.com

Read More...

CSS Positioning of elements

With CSS positioning, you can place an element exactly where you want it on your page. Together with floats, positioning gives you many possibilities to create an advanced and precise layout.
The following will be discussed in this lesson:
  • The principle behind CSS positioning
  • Absolute positioning
  • Relative positioning

The principle behind CSS positioning

Imagine a browser window as a system of coordinates:
CSS Positioning of elements
The principle behind CSS positioning is that you can position any box anywhere in the system of coordinates.
Let’s say we want to position a headline. By using the box model (see lesson css box model) the headline will appear as follows:
CSS Positioning of elements
If we want this headline positioned 100px from the top of the document and 200px from the left of the document, we could type the following in our CSS:
 
 h1 {
  position:absolute;
  top: 100px;
  left: 200px;
 }
 
The result will be as follows:
CSS Positioning of elements
As you can see, positioning with CSS is a very precise technique to place elements. It is much easier than trying to use tables, transparent images or anything else.

Absolute positioning

An element which is positioned absolute does not obtain any space in the document. This means that it does not leave an empty space after being positioned.
To position an element absolutely, the position property is set as absolute. You can subsequently use the properties leftrighttop, and bottom to place the box.
As an example of absolute positioning, we choose to place 4 boxes in each corner of the document:
 
 #box1 {
  position:absolute;
  top: 50px;
  left: 50px;
 }

 #box2 {
  position:absolute;
  top: 50px;
  right: 50px;
 }

 #box3 {
  position:absolute;
  bottom: 50px;
  right: 50px;
 }

 #box4 {
  position:absolute;
  bottom: 50px;
  left: 50px;
 }
 

Relative positioning

To position an element relatively, the property position is set as relative. The difference between absolute and relative positioning is how the position is being calculated.
The position for an element which is relatively positioned is calculated from the original position in the document. That means that you move the element to the right, to the left, up or down. This way, the element still obtains a space in the document after it is positioned.
As an example of relative positioning, we can try to position three pictures relatively to their original position on the page. Notice how the pictures leave empty spaces at their original positions in the document:
 
 #dog1 {
  position:relative;
  left: 350px;
  bottom: 150px;
 }
 #dog2 {
  position:relative;
  left: 150px;
  bottom: 500px;
 }

 #dog3 {
  position:relative;
  left: 50px;
  bottom: 700px;
 }
 

Summary

In the previous two lessons, you learned how to float and position elements. These two methods give you many opportunities to construct your pages without having to use some of the old-fashioned methods with tables and transparent images in HTML. Use CSS instead. It is more precise, gives you more advantages, and it is also far easier to maintain.

Article Source:http://www.techstarcle.com

Read More...

Floating elements (floats) CSS Tutorial

An element can be floated to the right or to left by using the property float. That is to say that the box with its contents either floats to the right or to the left in a document (or the containing box) (see lesson 9 for a description of the Box model). The following figure illustrates the principle:
Floating elements (floats)
If we for example would like to have a text wrapping around a picture, the result would be like this:
Floating elements (floats)

How is it done?

The HTML code for the example above, look as follows:
 
 <div id="picture">
  <img src="bill.jpg" alt="Bill Gates">
 </div>

 <p>causas naturales et antecedentes, 
 idciro etiam nostrarum voluntatum...</p>
 
To get the picture floating to the left and the text to surround it, you only have to define the width of the box which surrounds the picture and thereafter set the property float to left:
 
 #picture {
  float:left;
  width: 100px;
 }
 

Another example: columns

Floats can also be used for columns in a document. To create the columns, you simply have to structure the desired columns in the HTML-code with<div> as follows:
 
 <div id="column1">
  <p>Haec disserens qua de re agatur
  et in quo causa consistat non videt...</p>
 </div>

 <div id="column2">
  <p>causas naturales et antecedentes, 
  idciro etiam nostrarum voluntatum...</p>
 </div>

 <div id="column3">
  <p>nam nihil esset in nostra 
  potestate si res ita se haberet...</p>
 </div>
 
Now the desired width of the columns is set to e.g. 33%, and then you simply float each column to the left by defining the property float:
 
 #column1 {
  float:left;
  width: 33%;
 }

 #column2 {
  float:left;
  width: 33%;
 }

 #column3 {
  float:left;
  width: 33%;
 }
 
float can be set as either leftright or none.

The property clear

The clear property is used to control how the subsequent elements of floated elements in a document shall behave.
By default, the subsequent elements are moved up to fill the available space which will be freed when a box is floated to a side. Look at the example above wherein the text is automatically moved up beside the picture of Bill Gates.
The property clear can assume the values leftrightboth or none. The principle is, if clear, for example, is set to both for a box, the top margin border of this box will always be under the lower margin border for possible floating boxes coming from above.
 
 <div id="picture">
  <img src="bill.jpg" alt="Bill Gates">
 </div>

 <h1>Bill Gates</h1>

 <p class="floatstop">causas naturales et antecedentes, 
 idciro etiam nostrarum voluntatum...</p>
 
To avoid the text from floating up next to the picture, we can add the following to our CSS:
 
 #picture {
  float:left;
  width: 100px;
 }

 .floatstop {
  clear:both;
 }
 

Summary

Floats are useful in many situations and will often be used together with positioning. In the next lesson we will take a closer look at how to position a box, either relative or absolute.

Article Source:http://www.techstarcle.com

Read More...
 
Copyright (c) 2016 programmertrends